1. Smart Home SDK Integration Protocol V1.1.0
| Version | Change log |
|---|---|
| V1.0.0 | Initial version |
| V1.0.1 | Added chapter VI, added lighting scenes |
| V1.0.2 | Added RS485 plugin development & storage space |
| V1.0.3 | Added command set for the plugin to control central control screen devices in reverse |
| V1.0.4 | Added plugin device discovery and plugin debug information interfaces |
| V1.0.5 | Revised the device control and status feedback sections |
| V1.0.6 | Completed the plugin packaging, testing and release documentation |
| V1.0.7 | Added relay control |
| V1.0.8 | Added factory test method |
| V1.0.9 | Revised the packaging and release section |
| V1.1.0 | Added the TV type |
The smart home SDK integration method is intended for companies with embedded Linux C development capability, and supports device logon, device discovery, device control and device status feedback.
1.1. I. Quick experience
1.1.1. 1. Build environment setup
This plugin supports compiling and development only under Ubuntu. Click to download the GCC cross-compilation toolchain. Install the adb tool on the PC (use the standard Android adb tool) and connect the PC and the Xiaoke host with a USB cable; network adb is not supported.
1.1.2. 2. Download the demo plugin
Click to download the demo plugin, push the ipk file to the host with the adb push jdsmart_demo_xxx_sunxi.ipk /data/jdsmart_demo.ipk command, then on the PC enter the Xiaoke host terminal with the adb shell command and run opkg install /data/jdsmart_demo.ipk to install the demo plugin (it only needs to be installed once).
1.1.3. 3. Restart the UI process
Enter the Xiaoke host terminal with the adb shell command and run the /etc/init.d/jd_ui restart command to restart the UI process and load the new demo plugin.
1.1.4. 4. Smart home demo description
The smart home demo plugin demonstrates the logon QR code, discovery of devices and scenes, device status feedback and other basic functions.
Logon -> discover devices and scenes -> display devices and scenes -> tap in the UI or use voice to control scenes and devices
You can view the logon QR code on the host under Desktop->Settings->Smart home->Smart host management; in the demo, logon succeeds automatically after 10 seconds and the devices are discovered. Once device discovery is complete, the devices appear on the left screen of the desktop and the scenes on the right screen. You can then tap or use voice to control the devices or scenes.
1.1.5. 5. Hardware integration of third-party smart home modules (optional)
A third-party smart home vendor can replace the original Zigbee hardware module with its own hardware module (such as Bluetooth, a Zigbee module or 485) to achieve integrated hardware gateway and central control screen; this requires contacting Xiaoke's business and technical staff to discuss the details. The main controller communicates with the third-party smart home hardware module over a serial port (a serial port with flow control may be used), the node is /dev/ttyS3.
1.2. II. Compiling and developing the plugin
1.2.1. 1. Compile and debug the demo plugin
Please read the Quick experience chapter first and install the demo plugin. Click to download the demo plugin source code; after unzipping it, change the COMPILE_PREX path in the build.sh file to the path of the cross compiler and run ./build.sh to build libjdsmart_demo.so, which is then pushed to the Xiaoke host over USB adb to update the library. (How to enable ADB? In Settings>About this device>tap the blank area in the upper right corner 5 or more times>enter the developer options>tick ADB debugging.) Run the /etc/init.d/jd_ui stop command to stop the UI service, run /mnt/app/jd_ui/bin/SmartSpeaker to start the UI application, and you can print debug output with C printf.
1.2.2. 2. Flow chart
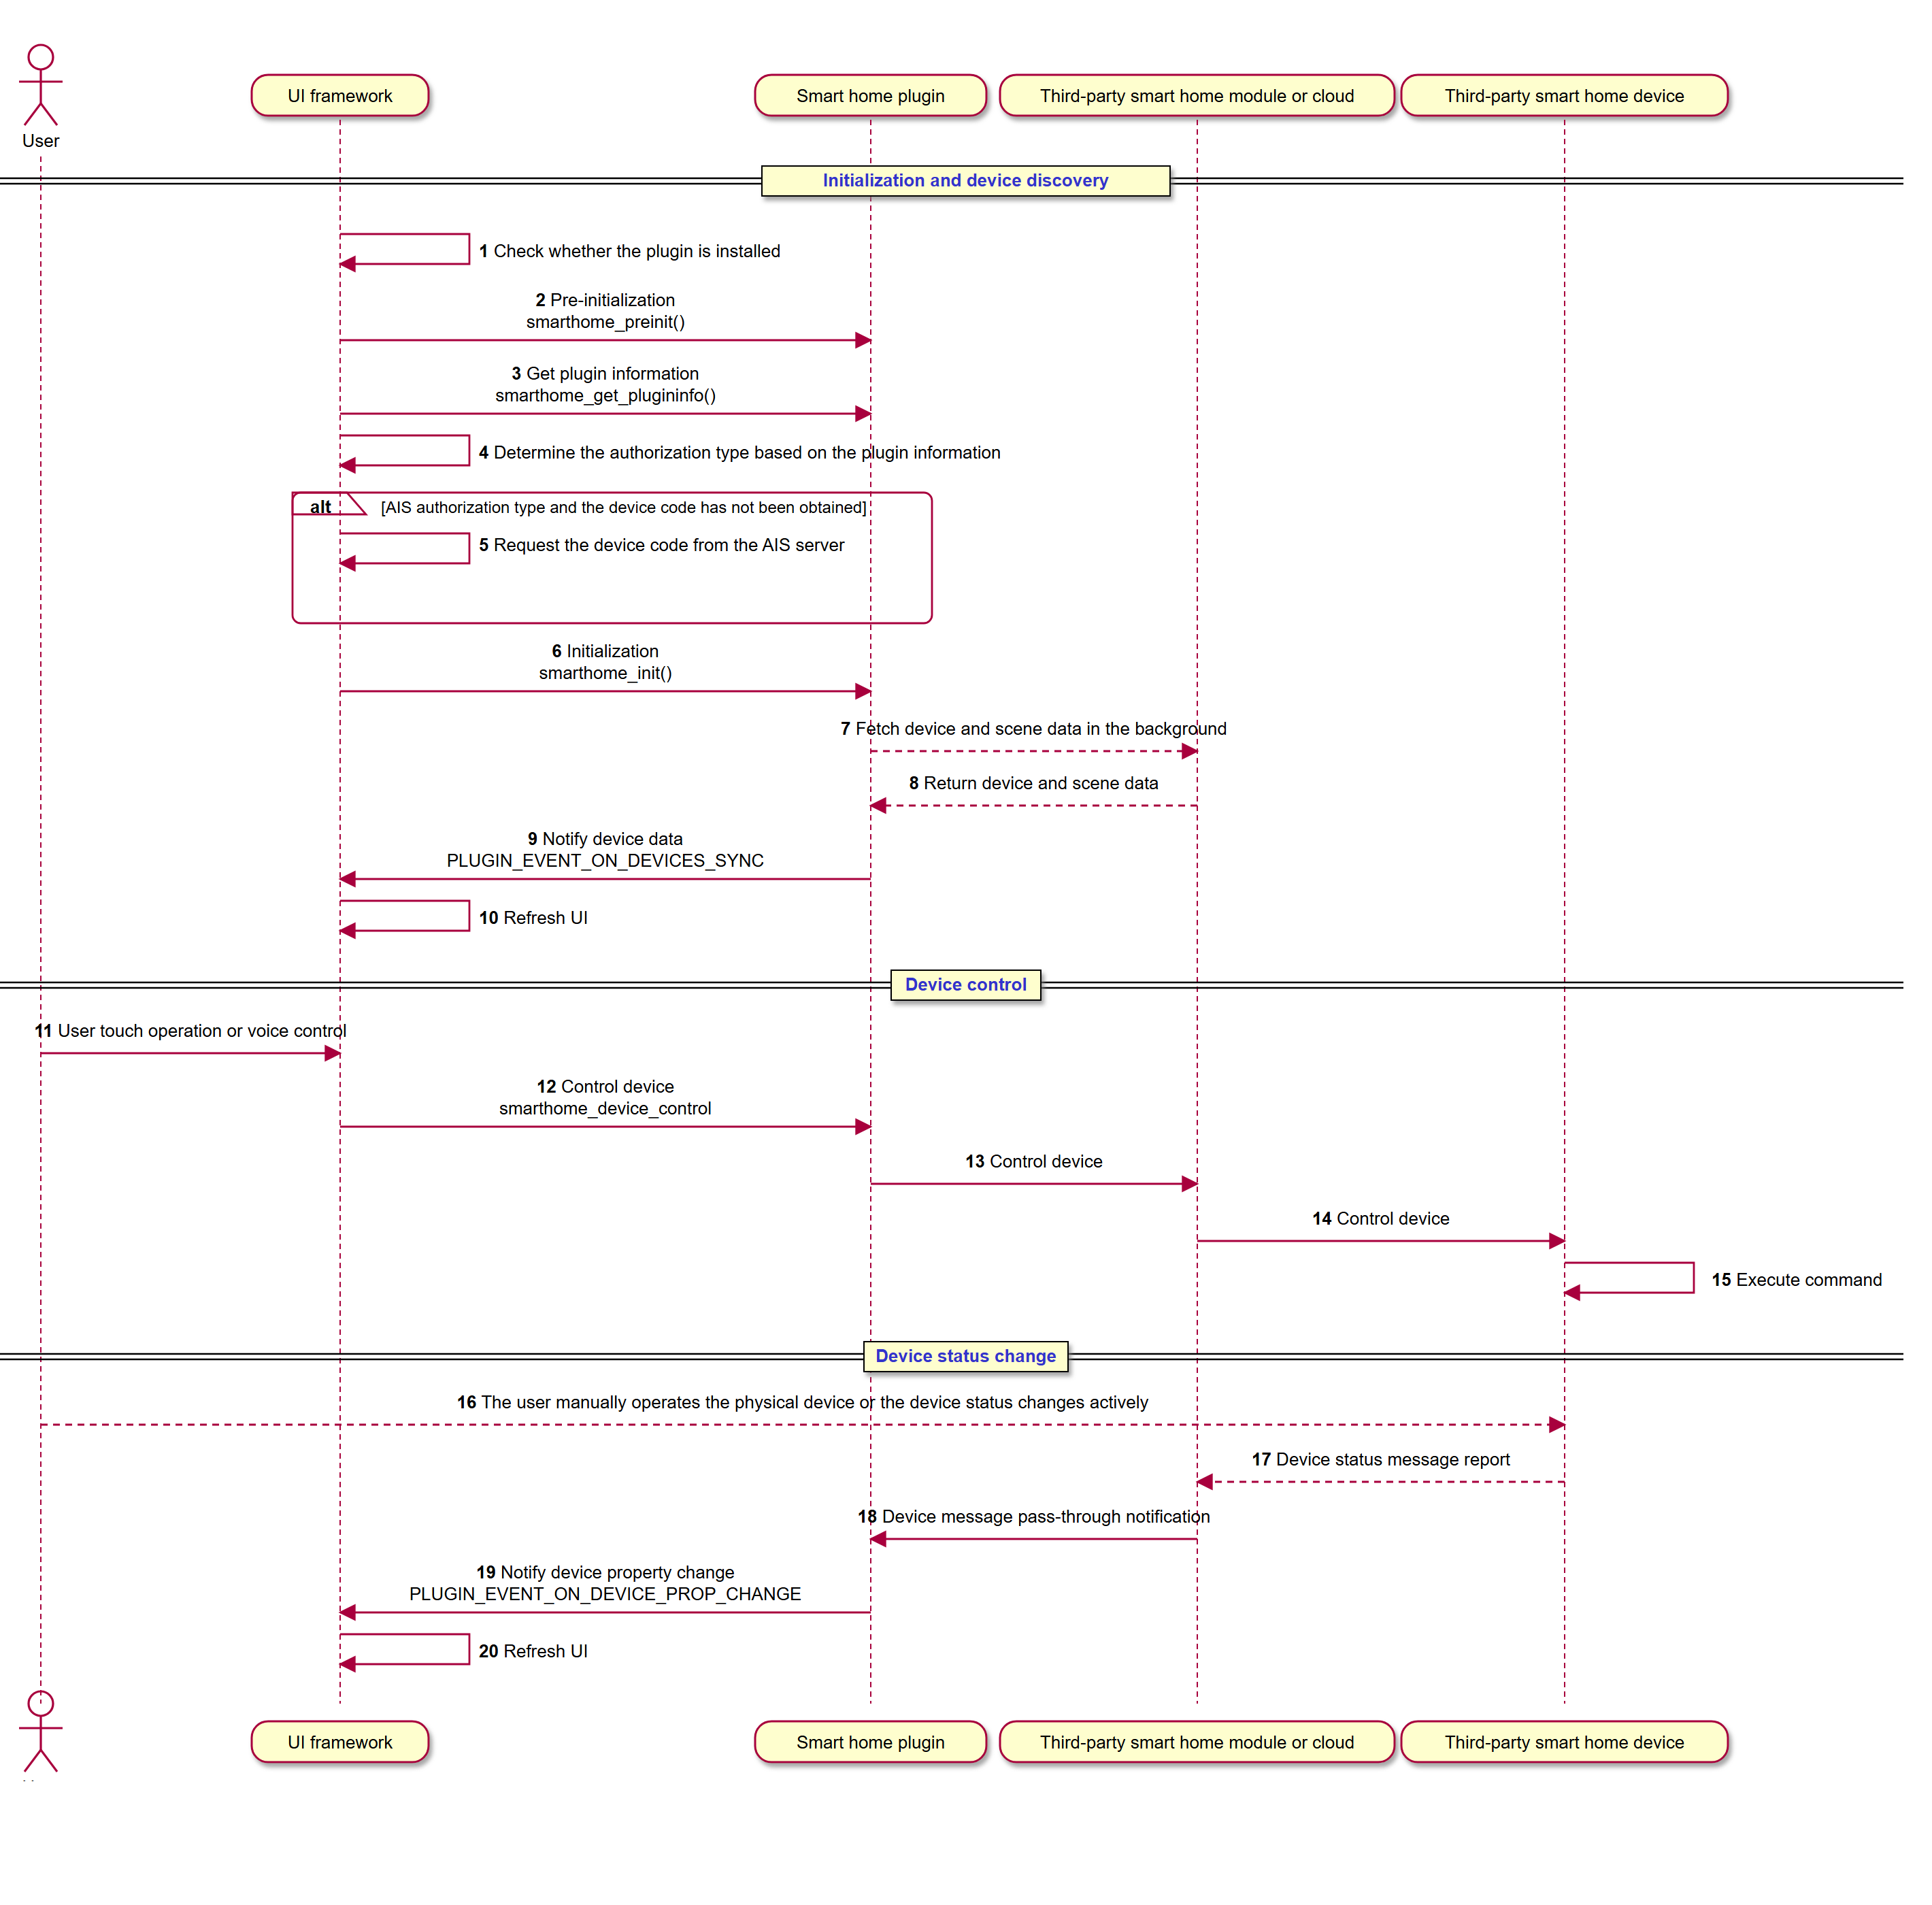
1.2.3. 3. API description
The integration plugin must implement the following functions; for a description of what each function does, refer to the comments in the demo source code.
/**
 * @brief  Pre-initialization
 * @note
 * @param  params: none for now
 * @param  listener: application layer callback function, must be stored locally
 * @retval
 */
int smarthome_preinit(char* params, callback_func listener);
/**
 * @brief  Initialization
 * @note
 * @param  params: {
                      "uuid":    "plugin device id bound in the AIS back end (if the device id and key are managed by AIS)",
                      "key":    "plugin device key bound in the AIS back end",
                      "deviceID":    "unique ID of this device"
                  }
 * @param  listener: not needed for now
 * @retval
 */
int smarthome_init(char* params, callback_func listener);
/**
 * @brief  Get the status
 * @note
 * @retval      PLUGIN_STATE_FAIL
                PLUGIN_STATE_IDLE
                PLUGIN_STATE_INITED
                PLUGIN_STATE_GET_CODE
                PLUGIN_STATE_GET_TOKEN
                PLUGIN_STATE_LOGGED
 */
int smarthome_get_state();
/**
 * @brief  Get the plugin information
 * @note
 * @retval
 */
char* smarthome_get_pluginfo();
/**
 * @brief  Control command sent by the Linux central control screen
 * @note
 * @param  params: {
                    "id":"vdevo161103533857949",   //device id
                    "type":"aircondition",         //device type
                    "sub_type":"unknown",          //device sub type
                    "action":"SetTemperature",     //action
                    "value":"19"                   //value
                    }
 * @param  callback: (void* context, int code, void *result)
    context: not used for now
    code:  0: normal -1: error
    result: text passed when code indicates an error, used for display, for example "Control failed, network error"
 * @retval
 */
int smarthome_device_control(const char* params, callback_func callback)
/**
 * @brief  Discover devices, usually used to refresh the device list
 * @note
 * @param  method:
 * @param  callback:
 * @retval
 */
int smarthome_device_discover(int method, callback_func callback);
/**
 * @brief  Reset or unbind
 * @note
 * @retval
 */
int smarthome_reset();
/**
 * @brief  Extended command
 * @note
 * @retval
 */
int smarthome_ioctl(char* cmd, char* key, char* value);
1.3. III. Protocol description
1.3.1. 3.1 Basic integration requirements
- Be able to provide all device list data; the device information must contain the device ID, device name and device type
- Be able to provide all scene list data; the scene information must contain the scene ID and scene name
- Be able to provide all room list data; the room information must contain the room ID and room name
1.3.2. 3.2 Device discovery protocol
Example:
{
    "version":1,                                //version number
    "name":"DiscoveryDevicesResponse",
    "devices":[
        {
            "deviceId":"vdevo162130282208556",   //device id
            "deviceName":"Colour light",                //device name
            "online":1,                          //device online status 1 online, 0 offline
            "actions":[                            //actions
                {
                    "action":"TurnOn"
                },
                {
                    "action":"TurnOff"
                },
                {
                    "action":"SetMode",
                    "instructions":[
                        {
                            "value":"lightWhite",
                            "code":"lightWhite",
                            "desc":"White light"
                        },
                        {
                            "value":"lightColour",
                            "code":"lightColour",
                            "desc":"Colour light"
                        },
                        {
                            "value":"lightScene",
                            "code":"lightScene",
                            "desc":"Scene"
                        }
                    ]
                },
                {
                    "action":"SetBrightness"
                },
                {
                    "action":"SetColorTemperature"
                },
                {
                    "action":"SetColor"
                },
                {
                    "action":"SetScene",
                    "instructions":[
                        {
                            "value":"light_scene_1",
                            "code":"light_scene_1",
                            "desc":"Good night"
                        },
                        {
                            "value":"light_scene_2",
                            "code":"light_scene_2",
                            "desc":"Reading"
                        },
                        {
                            "value":"light_scene_3",
                            "code":"light_scene_3",
                            "desc":"Working"
                        },
                        {
                            "value":"light_scene_4",
                            "code":"light_scene_4",
                            "desc":"Leisure"
                        }
                    ]
                }
            ],
            "properties":[                                  //properties
                {
                    "name":"powerstate",
                    "value":"on"
                },
                {
                    "name":"mode",
                    "value":"lightWhite"
                },
                {
                    "name":"brightness",
                    "value":"18"
                },
                {
                    "name":"color_temperature",
                    "value":"10"
                },
                {
                    "name":"color_hsv",
                    "value":"{\"h\":0,\"s\":0,\"v\":1}"
                }
            ],
            "zone":"Balcony",                      //room name
            "deviceType":"light",               //device type
            "deviceSubType":"unknown"           //device sub type
        },
        {
            "deviceId":"SN8hzCSAbWrCtjIE",
            "deviceName":"Morning",
            "icon":"scene_meet",
            "deviceType":"smartscene",
            "actions":[
                {
                    "action":"TurnOn"
                }
            ]
        }
    ]
}
1.3.3. 3.3 Device control protocol
The control command from the APP layer is passed through the params argument of the smarthome_device_control function.
Brightness control
{
    "id":"vdevo162192408876410",
    "type":"light",
    "sub_type":"",
    "action":"SetBrightness",
    "value":"53"        //the brightness value is 0~100
}

Colour control
{
    "id":"vdevo162130282208556",
    "type":"light",
    "sub_type":"",
    "action":"SetColor",
    "value":"{\"h\":359.37823486328125,\"s\":0.75686275959014893,\"v\":1}"  //h: 0~360 s: 0~1 v: 0~1
}

Colour temperature control
{
    "id":"vdevo161847485227864",
    "type":"light",
    "sub_type":"",
    "action":"SetColorTemperature",
    "value":"50"        //the colour temperature value is 0~100
}

Temperature control
{
    "id":"vdevo161103533857949",
    "type":"aircondition",
    "sub_type":"",
    "action":"SetTemperature",
    "value":"20"        //temperature value
}

Wind speed control
{
  "id": "vdevo161103533857949",
  "type": "aircondition",
  "sub_type": "unknown",
  "action": "SetWindSpeed",
  "value": "medium"
}

Mode control
{
  "id": "vdevo163635070912018",
  "type": "aircondition",
  "sub_type": "unknown",
  "action": "SetMode",
  "value": "cold"
}

Wind direction control
{
    "version":1,
    "deviceId":"vdevo161103533857949",
    "name":"switch_horizontal",     //switch_horizontal swings left and right, switch_vertical swings up and down
    "value":"on"                    //on to enable, off to disable
}

Channel control
{"id":"deviceid_xxx","type":"tv","action":"AdjustUpChannel"}
{"id":"deviceid_xxx","type":"tv","action":"AdjustDownChannel"}

Volume control
{"id":"deviceid_xxx","type":"tv","action":"AdjustUpVolume"}
{"id":"deviceid_xxx","type":"tv","action":"AdjustDownVolume"}
{"id":"deviceid_xxx","type":"tv","action":"Mute"}
1.3.4. 3.4 Device property status feedback
Refer to the demo source code: when a property changes on the device side, it is passed to the APP layer through g_context->listener(NULL, PLUGIN_EVENT_ON_DEVICE_PROP_CHANGE, result); with the result argument.
Online status property feedback
{
    "version":1,
    "deviceId":"vdevo162088709984066#1",
    "name":"online",
    "value":"1"     // 1 online, 0 offline
}

On/off property feedback
{"version":1,"deviceId":"vdevo163005316473671","name":"powerstate","value":"off"}

Brightness property feedback
{"version":1,"deviceId":"vdevo163005316473671","name":"brightness","value":"51"}

Colour property feedback
{"version":1,"deviceId":"vdevo162130282208556","name":"color_hsv","value":"{\"h\":5,\"s\":1,\"v\":0.400000}"}

Temperature property feedback
{"version":1,"deviceId":"vdevo163635070912018","name":"temperature","value":"26"}

Mode property feedback
{"version":1,"deviceId":"vdevo163635070912018","name":"mode","value":"cold"}
1.4. IV. Device categories currently supported
1.4.1. Smart device types
| Name | Functions | Macro | Type | Sub type |
|---|---|---|---|---|
| Light | On/off, brightness, warm and cool white, scene modes | DEVICE_TYPE_LIGHT | light | |
| Switch | On/off | DEVICE_TYPE_SWITCH | switch | |
| Socket | On/off | DEVICE_TYPE_OUTLET | outlet | |
| Power strip | On/off | DEVICE_TYPE_SOCKETS | sockets | |
| Curtain | Open, close, pause, open percentage control | DEVICE_TYPE_CURTAIN | curtain | |
| Air conditioner | On/off, set Celsius temperature, working mode, wind speed mode, up and down swing, left and right swing, current temperature | DEVICE_TYPE_AIRCONDITION | aircondition | |
| Air purifier | On/off, working mode, wind speed mode, current temperature, current humidity, pm2.5, air quality | DEVICE_TYPE_AIRPURIFIER | airpurifier | |
| Fresh air | On/off, working mode, wind speed mode, current temperature, current humidity, pm2.5 | DEVICE_TYPE_AIR_FRESHER | airfresh | |
| Clothes dryer rack | On/off, raise, lower, pause, light, sterilization, drying, air drying | DEVICE_TYPE_HANGER | hanger | |
| Floor heating | On/off, working mode, current temperature, set Celsius temperature | DEVICE_TYPE_AIRCONDITION | aircondition | floor_heat |
| Thermostat | On/off, working mode, current temperature, set Celsius temperature | DEVICE_TYPE_AIRCONDITION | aircondition | temperature_ctrl |
| TV | On/off, previous channel, next channel, volume up and down, mute | DEVICE_TYPE_TV | tv |
1.4.2. Sensor types
| Name | Functions | Macro | Type |
|---|---|---|---|
| Temperature and humidity sensor | Current temperature, current humidity, battery percentage | SENSOR_TYPE_WSD | temperature_humidity |
| Door magnetic sensor | Door magnetic state, battery percentage | SENSOR_TYPE_MAGNETIC | magnetic |
| Gas alarm | Gas detection value, battery percentage | SENSOR_TYPE_GAS | gas |
| Water leak sensor | Water leak detection state, battery percentage | SENSOR_TYPE_WATER | water |
| pir sensor | Human presence state, battery percentage | SENSOR_TYPE_PIR | pir |
| sos sensor | Alarm state, battery percentage | SENSOR_TYPE_SOS | sos |
1.5. V. Device command sets and properties
1.5.1. 5.1 Device command set
| Macro | Name | Description |
|---|---|---|
| DEVICE_ACTION_TURN_ON | TurnOn | Turn on |
| DEVICE_ACTION_TURN_OFF | TurnOff | Turn off |
| DEVICE_ACTION_PAUSE | Pause | Pause |
| DEVICE_ACTION_TURN_UP | TurnUp | Raise |
| DEVICE_ACTION_TURN_DOWN | TurnDown | Lower |
| DEVICE_ACTION_SET_MODE | SetMode | Set mode |
| DEVICE_ACTION_SET_SCENE | SetScene | Set scene |
| DEVICE_ACTION_SWITCH_HORIZONTAL | SwitchHorizontal | Set left and right swing |
| DEVICE_ACTION_SWITCH_VERTICAL | SwitchVertical | Set up and down swing |
| DEVICE_ACTION_SET_TEMPERATURE | SetTemperature | Set temperature |
| DEVICE_ACTION_SET_WINDSPEED | SetWindSpeed | Set wind speed |
| DEVICE_ACTION_SET_BRIGHTNESS | SetBrightness | Set brightness |
| DEVICE_ACTION_SET_COLOR_TEMPERATURE | SetColorTemperature | Set colour temperature |
| DEVICE_ACTION_SET_COLOR | SetColor | Set colour |
| DEVICE_ACTION_SET_PROGRESS | SetProgress | Set progress |
| DEVICE_ACTION_SWITCH_LIGHT | SwitchLight | Light |
| DEVICE_ACTION_SWITCH_STERILIZE | SwitchSterilize | Sterilization |
| DEVICE_ACTION_SWITCH_AIRDRY | SwitchAirdry | Air drying |
| DEVICE_ACTION_SWITCH_DRYING | SwitchDrying | Drying |
| DEVICE_ACTION_ADJUST_UP_CHANNEL | AdjustUpChannel | Channel up |
| DEVICE_ACTION_ADJUST_DOWN_CHANNEL | AdjustDownChannel | Channel down |
| DEVICE_ACTION_ADJUST_UP_VOLUME | AdjustUpVolume | Volume up |
| DEVICE_ACTION_ADJUST_DOWN_VOLUME | AdjustDownVolume | Volume down |
| DEVICE_ACTION_MUTE | Mute | Mute |
1.5.2. 5.2 Device properties
| Macro | Name | Description |
|---|---|---|
| DEVICE_PROPERTIE_MODE | mode | Mode |
| DEVICE_PROPERTIE_TEMPERATURE | temperature | Temperature |
| DEVICE_PROPERTIE_CURRENT_TEMPERATURE | current_temperature | Current temperature |
| DEVICE_PROPERTIE_WINDSPEED | windspeed | Wind speed |
| DEVICE_PROPERTIE_POWERSTATE | powerstate | Power state |
| DEVICE_PROPERTIE_BRIGHTNESS | brightness | Brightness |
| DEVICE_PROPERTIE_CTRL | ctrl | Control |
| DEVICE_PROPERTIE_COLOR_HSV | color_hsv | Colour (hsv format) |
| DEVICE_PROPERTIE_COLOR_TEMPERATURE | color_temperature | Colour temperature |
| DEVICE_PROPERTIE_HUMIDITY | humidity | Humidity |
| DEVICE_PROPERTIE_BATTERY_PERCENTAGE | battery_percentage | Battery level |
| DEVICE_PROPERTIE_SENSOR_INFO | sensor_info | Sensor information |
| DEVICE_PROPERTIE_SENSOR_GAS | sensor_gas_value | Gas value |
| DEVICE_PROPERTIE_PM | pm25 | PM2.5 |
| DEVICE_PROPERTIE_AIRQUALITY | air_quality | Air quality |
| DEVICE_PROPERTIE_SWITCH_LIGHT | switch_light | Light |
| DEVICE_PROPERTIE_SWITCH_STERILIZE | switch_sterilize | Sterilization |
| DEVICE_PROPERTIE_SWITCH_AIRDRY | switch_airdry | Air drying |
| DEVICE_PROPERTIE_SWITCH_DRYING | switch_drying | Drying |
| DEVICE_PROPERTIE_PROGRESS | progress | Progress |
| DEVICE_PROPERTIE_SWITCH_HORIZONTAL | switch_horizontal | Left and right swing |
| DEVICE_PROPERTIE_SWITCH_VERTICAL | switch_vertical | Up and down swing |
| DEVICE_PROPERTIES_VALUE_ON | on | On |
| DEVICE_PROPERTIES_VALUE_OFF | off | Off |
1.5.3. 5.3 Mode definitions
| Macro | Name | Description |
|---|---|---|
| DEVICE_MODE_COLD | cold | Cooling |
| DEVICE_MODE_HEAT | heat | Heating |
| DEVICE_MODE_AUTO | auto | Automatic |
| DEVICE_MODE_AIRSUPPLY | airsupply | Fan |
| DEVICE_MODE_DEHUMIDIFICATION | dehumidification | Dehumidification |
| DEVICE_MODE_MANUAL | manual | Manual |
| DEVICE_MODE_ENERGY | energy | Power saving |
| DEVICE_MODE_COMFORTABLE | comfortable | Comfortable |
| DEVICE_MODE_HOLIDY | holiday | Holiday |
| DEVICE_MODE_ECO | eco | eco |
| DEVICE_MODE_SLEEP | sleep | Sleep |
| DEVICE_MODE_PROGRAM | program | Programmed control |
| DEVICE_MODE_FLOOR_HEAT | floorHeat | Floor heating |
| DEVICE_MODE_AUXILIARY_HEAT | auxiliaryHeat | Auxiliary heating |
| DEVICE_MODE_SILENT | silent | Silent |
1.5.4. 5.4 Wind speed definitions
| Macro | Name | Description |
|---|---|---|
| DEVICE_WINDSPEED_AUTO | auto | Automatic |
| DEVICE_WINDSPEED_HIGH | high | High wind |
| DEVICE_WINDSPEED_MIDDLE | medium | Medium wind |
| DEVICE_WINDSPEED_LOW | low | Low wind |
| DEVICE_WINDSPEED_HEALTH | health | Healthy |
| DEVICE_WINDSPEED_NATURAL | natural | Natural |
| DEVICE_WINDSPEED_STRONG | strong | Strong |
| DEVICE_WINDSPEED_QUIET | quietWind | Quiet wind |
| DEVICE_WINDSPEED_SLEEP | sleep | Sleep |
| DEVICE_WINDSPEED_COMFORTABLE | comfortableWind | Comfortable wind |
1.6. VI. Other
1.6.1. 6.1 Log storage
The plugin can store its logs in the /tmp/ path; if the user uploads the logs, they will be packed and uploaded to the Xiaoke server. Refer to the code below, and do not change the .smart.log file name.
static FILE* g_fp_log;
static int g_log_size;

void my_log(char* str) {
  // printf("%s", str);  //debug

  if (g_fp_log == NULL) {
    g_fp_log = fopen("/tmp/.smart.log", "w");
    g_log_size = 0;
  }

  if (g_fp_log) {
    int len = fprintf(g_fp_log, "%s", str);
    fflush(g_fp_log);
    g_log_size += len;
    // printf(">>>> g_log_size=%d\n", g_log_size);

    if (g_log_size > 1024 * 512) {
      fclose(g_fp_log);
      system("mv /tmp/.smart.log /tmp/.smart.log.0");
      g_fp_log = NULL;
    }
  }
}
1.6.2. 6.2 Unbinding
Unbinding and logging out usually requires restarting the application; you can call the g_listener(NULL, PLUGIN_EVENT_REQ_REBOOT, NULL); or exit(0) function to restart it.
1.6.3. 6.3 Plugin packaging, testing and release
- When development is finished, before the trial production run, the compiled plugin library and its configuration files must be packaged in ipk format. First download the ipk packaging script Click to download. After unzipping it, open the ais_tlos_ipk_pack.sh file and change the configuration information, paying attention to
PKG_NAME, that is the plugin name, for examplejdsmart_abcd. UnderSettings>Smart home >Plugin informationyou can see this name asabcd. - Run the ais_tlos_ipk_pack.sh file to package it in ipk format. The developer first removes the test plugin package from the adb shell terminal with the
opkg remove jdsmart_democommand, then installs the new plugin package with theopkg install jdsmart_abcd_0.0.1-1_sunxi.ipkcommand. After installation, if the code has to be changed and the dynamic library updated for debugging, the/data/libjdsmart_abcd.sofile on the terminal device must be overwritten with adb push. After installation you can view the plugin related information underSettings>Smart home >Plugin information. - Once the developer's tests pass, the ipk package is placed on the developer's server and verified with
opkg install http://xxx.com/xx.ipk; after it passes, the download link is given to Xiaoke. If the developer needs an id parameter, Xiaoke can pass the device id parameter when accessing the download link. The developer must also provide the id of the test deviceSettings>About this device>Take a phototo Xiaoke. - The Xiaoke back end tags the corresponding plugin appid according to the test device id and configures the ipk download link; if the plugin is upgraded in the future, repeat the steps above. Plugins support silent upgrades from the back end; after a tagged device is restored to factory settings, it automatically downloads and installs the plugin again once it connects to the network.
- When a mass production order is placed, the sales staff must be notified to tag the plugin that needs to be installed by
appid; the Xiaoke production department will collect the device ids of that order and tag the corresponding plugin in the Xiaoke back end.
1.6.4. 6.4 Plug flags
Certain specific features can be enabled by changing the flag in the smarthome_get_pluginfo() function.
| Flag | Description |
|---|---|
| PLUG_FLAG_LOAD_OFFLINE | Supports offline loading |
| PLUG_FLAG_STATE_FEEDBACK | The on/off button changes only after the device status is fed back |
| PLUG_FLAG_SMART_BUS | The plugin occupies the RS485 device, used for 485 plugin development |
| PLUG_FLAG_NO_SMART_BUS | The plugin disables RS485, and 485 related configuration is not shown in the UI |
| PLUG_FLAG_PAIRD_DEVICES | The plugin supports device discovery and automatic pairing |
1.6.5. 6.5 RS485 plugin development
RS485 plugin development requires setting the PLUG_FLAG_SMART_BUS flag from section 6.4 first; the RS485 file node to operate is
/dev/ttyS5The IO node that must be operated when sending and receiving on 485 is
/sys/xfocus/max485/pin_re; the following is the pseudo code for 485 transmission:
    echo 1 > /sys/xfocus/max485/pin_re
    len = write(fd, data, datalen);
    int ret = ioctl(fd, 0xFFFF5555, 300);
1.6.6. 6.6 Plugin space and data storage
The space used by the plugin code should be kept within 4MB. Plugin data may be stored in /data/jdsmart_open/, and should not exceed 2MB, otherwise there will not be enough space for OTA upgrades.
1.6.7. 6.7 Command set for the plugin to control central control screen devices in reverse
Calling the slave_on_dp_cb function below sends control commands to the central control screen devices. The corresponding parameters are defined as follows
/**
 * @brief
 * @note
 * @param  i0:  //command value
           i1:  //other parameters
           s0:  //other parameters
 * @retval
 */
static void slave_on_dp_cb(int i0, int i1, char *s0) {
  cJSON* root = cJSON_CreateObject();
  cJSON_AddNumberToObject(root, "i0", i0);
  cJSON_AddNumberToObject(root, "i1", i1);
  cJSON_AddStringToObject(root, "s0", s0);
  char* json_str = cJSON_PrintUnformatted(root);
  cJSON_Delete(root);
  g_listener(NULL, PLUGIN_EVENT_SLAVE_CONTROL, json_str);
  free(json_str);
}
| Command value(i0) | Command name (macro definition) | Direction | Function | Request parameters | PubAck reply parameters |
|---|---|---|---|---|---|
| 100 | MEDIA_GET_METADATA | C->S | Get metadata | None | s0: see metadata |
| 101 | MEDIA_PLAY | C->S | Play | None | No parameters |
| 102 | MEDIA_PAUSE | C->S | Pause | None | No parameters |
| 103 | MEDIA_NEXT | C->S | Next track | None | No parameters |
| 104 | MEDIA_PREV | C->S | Previous track | None | No parameters |
| 105 | MEDIA_SEEK | C->S | Seek | i1: seek position, in seconds | No parameters |
| 106 | MEDIA_GET_POSITION | C->S | Get the playback position | None | s0: current time (seconds):total time (seconds) |
| 107 | MEDIA_SET_VOLUME | C->S | Set the volume | i1: volume value (0~100) | No parameters |
| 108 | MEDIA_GET_VOLUME | C->S | Get the volume | None | i1: volume value (0~100) |
| 109 | MEDIA_GET_ALL_LOCAL_MEDIA | C->S | Get all local song information | None | s0: array of simple music metadata |
| 111 | MEDIA_SWITCH_PLAY_MODE | C->S | Switch the playback mode; for radio stations it reports that radio mode switching is not supported | None | No parameters |
| 115 | MEDIA_GET_PLAY_MODE | C->S | Get the current playback mode | None | i1: playback mode 0:repeat all 1:repeat one 2:shuffle |
| 116 | MEDIA_PLAY_TTS | C->S | Play a TTS text with the voice | s0:TTS text | No parameters |
| 117 | MEDIA_PLAY_HINT | C->S | Play a notification tone. It plays /mnt/UDISK/custom/audio/tone/tone, where the number is i1+1 |
i1: tone id, valid range [0~3], corresponding to the audio files tone[1~4].mp3 | No parameters |
| 118 | MEDIA_PLAY_HINT_PATH | C->S | Play a notification tone | s0:full path of the notification tone | No parameters |
| 119 | MEDIA_GET_AUDIO_SOURCE | C->S | Get the current audio source | None | s0: the current audio source |
| 120 | MEDIA_SET_AUDIO_SOURCE | C->S | Switch the audio source | s0:target audio source | No parameters |
| 123 | MEDIA_SET_SONGLIST | C->S | Play a favourited playlist | i1: playlist id 0:Sleep 1:Sport 2:Work 3:Leisure 4:Entertainment 5:Go home 6:Morning 7:Dining 8:Cooking |
No parameters |
| 150 | MEDIA_REPORT_METADATA | S->C | Report metadata | s0: see metadata | The client does not need to reply |
| 151 | MEDIA_REPORT_PlAY_STATE | S->C | Report the playback state | i1: playback state 0:paused 1:playing 2:buffering finished |
The client does not need to reply |
| 152 | MEDIA_REPORT_VOLUME | S->C | Report the volume | i1:volume value (0~100) | The client does not need to reply |
| 153 | MEDIA_REPORT_PLAY_MODE | S->C | Report the current playback mode | i1: playback mode 0:repeat all 1:repeat one 2:shuffle 3:play in order |
The client does not need to reply |
| 154 | MEDIA_REPORT_AUDIO_SOURCE | S->C | Report the current audio source | None | s0: current audio source sdcard: local bt:Bluetooth online:online auxin:external audio |
| 160 | MEDIA_GET_SONGLIST | S->C | Get playlists | s0.type: json parameters of the requested songs 0:recently played list 1:my favourites 2:my playlists 100:current playlist |
s0: array of music or playlist metadata |
| 161 | MEDIA_PLAY_SONGLIST | C->S | Play a playlist | s0:music metadata i1:playback mode |
No parameters |
| 200 | DEVICE_POWER_ON | C->S | Turn on the screen | None | No parameters |
| 201 | DEVICE_POWER_OFF | C->S | Turn off the screen | None | No parameters |
| 202 | DEVICE_POWER_REBOOT | C->S | Reboot | None | No parameters |
| 203 | DEVICE_GET_POWER_STATUS | C->S | Get the power status | None | i1: 0 means powered off, 1 means powered on |
| 204 | DEVICE_GET_INFO | C->S | Get device information | None | s0:Xiaoke host information uuid, name, version and so on |
| 210 | DEVICE_SWICTH_1 | C->S | Switch relay 1 | None | i1: 0 means off, 1 means on |
| 211 | DEVICE_SWICTH_2 | C->S | Switch relay 2 | None | i1: 0 means off, 1 means on |
| 212 | DEVICE_SWICTH_3 | C->S | Switch relay 3 | None | i1: 0 means off, 1 means on |
1.7. 6.7 Integration guide for products with relays
This section applies to Xiaoke products that have relays, such as the L9; if the device has no relay, this section can be ignored.
1.7.1. 6.7.1 Query the relay information of this device
The arguments of the smarthome_preinit() function pass the number of relay channels, the switchs_count parameter, to the plugin
1.7.2. 6.7.2 Control the relay switches
Flow: the relay switch is operated on the phone => the smart home cloud notifies the plugin of the switch state => the plugin reports the switch state to the device application layer => the application layer controls the relay switch
Refer to the demo_device_relay_control() function in the demo source code, which uses the g_context->listener(NULL, PLUGIN_EVENT_SLAVE_CONTROL, result); callback to tell the APP layer to control the relay switches.
1.7.3. 6.7.3 Relay switch state messages
Flow: the relay switch is operated on the device side => the device side notifies the plugin of the switch state => the plugin notifies the smart home cloud of the switch state
Refer to the smarthome_slave_report() function in the demo source code, which notifies the plugin with the DEVICE_REPORT_DEVICE_PROP command
1.7.4. 6.7.4 Renaming relay switches
Flow: a relay switch is renamed on the phone => the smart home cloud notifies the plugin of the switch rename message => the plugin reports the switch rename to the device application layer
Refer to the demo_device_relay_rename() function in the demo source code, which with DEVICE_SWICTH_NAME uses the g_context->listener(NULL, PLUGIN_EVENT_SLAVE_CONTROL, result); callback to tell the APP layer to store the relay names. After a relay switch is renamed, the application layer must be notified with PLUGIN_EVENT_ON_DEVICES_SYNC so that the devices are pulled again and only then does the UI update in real time.
1.8. 6.8 Plugin support for device discovery and automatic pairing
Set the PLUG_FLAG_PAIRD_DEVICES flag. After the plugin logs on successfully, tapping Settings -> Smart home -> Smart host management enters the plugin device discovery screen; tapping the Device discovery button calls the smarthome_ioctl("discovery_device",,) interface and shows the progress information of the plugin's device discovery, with support for multi-line text. Refer to the demo source code for the implementation.
1.9. 6.9 Plugin debug UI screen
Tap Settings -> Smart home -> Plugin information -> tap the plugin information 5 or more times to enter the plugin debug UI screen; this screen calls the smarthome_ioctl("get_debug_info",,) interface to obtain the plugin debug information to be displayed, with support for multi-line text.
1.10. 6.10 Custom scene pictures
In the plugin, scene pictures can be customized through the icon field (see the Device discovery protocol definition); if the icon field is not set, the upper-layer application chooses certain pictures according to the special characters contained in the scene name, and if no special character is contained it randomly uses one of the 4 default scene pictures.
static char* get_scene_pic(char *name) {
  if(strstr(name, "Go home"))
    return "scene_go_home";
  else if(strstr(name, "Leave home") || strstr(name, "Out") )
    return "scene_leave_home";
  else if(strstr(name, "Morning"))
    return "scene_wakeup";
  else if(strstr(name, "Sleep") || strstr(name, "Sleeping"))
    return "scene_sleep";
  else if(strstr(name, "Movie")) {
    return "scene_movie";
  }else if(strstr(name, "Guests")) {
    return "scene_meet";
  }else if(strstr(name, "Leisure")) {
    return "scene_leisure";
  }else if(strstr(name, "Sport")) {
    return "scene_sport";
  }else if(strstr(name, "Entertainment")) {
    return "scene_entertainment";
  }else if(strstr(name, "All on")) {
    return "scene_all_light_on";
  }else if(strstr(name, "All off")) {
    return "scene_all_light_off";
  }
  else {
    int hash_code = random_int_function % 4;
    switch (hash_code)
    {
    case 1:
      return "scene_default_1";
    case 2:
      return "scene_default_2";
    case 3:
      return "scene_default_3";
    default:
      return "scene_default_4";
    }
  }
}
1.11. 6.11 Factory test method
Tap Settings -> Advanced settings -> tap the upper right corner 3 or more times in a row -> Test mode to enter the test screen, which automatically calls the smarthome_ioctl("test_mode_start",,) interface and the plugin starts the factory test; when the test is finished, the result is notified with the PLUGIN_EVENT_ON_TEST_RESULT message, see the source code for details.
1.12. FAQ
FAQ.1 How to restore the factory settings
Tap Settings -> About this device -> tap the software version 5 or more times in a row -> Restore factory settings -> Reset the host
FAQ.2 How to clear plugin data
Tap Settings -> Smart home -> Plugin information -> tap the blank area in the upper right corner 5 or more times -> Clear data, which deletes the data under the /data/jdsmart_open/ path
FAQ.3 How the plugin plays tts text
Call the slave_on_dp_cb function with the MEDIA_PLAY_TTS command